---
title: Manage Team
description: "Manage your Sortly team: learn user roles, how to invite and remove users, set folder permissions, add or remove seats, and share inventory with customers."
---
[Skip to content](https://help.sortly.com/manage-team#main-content)

Open main navigation
Close main navigation
Looking for answers? Start here.
- There are no suggestions because the search field is empty.
1. [Sortly Help Center](https://help.sortly.com/?hsLang=en)
2. [Getting started](https://help.sortly.com/getting-started?hsLang=en)
3. [Managing Users and Permissions](https://help.sortly.com/getting-started?hsLang=en#managing-users-and-permissions)
# Manage Team
Sortly makes teamwork easier by letting you control who can view or edit specific parts of your inventory. Owners and Admins have full account access, while Team Members get access based on the permissions you assign to them.
In this article
1. [How user roles work](https://help.sortly.com/manage-team#how-it-works)
2. [Who can do what](https://help.sortly.com/manage-team#permissions)
3. [Invite or add a user](https://help.sortly.com/manage-team#invite-user)
4. [Set folder permissions for a Team Member](https://help.sortly.com/manage-team#set-permissions)
5. [Remove a user](https://help.sortly.com/manage-team#remove-user)
6. [Add or remove a user seat](https://help.sortly.com/manage-team#user-seats)
7. [Sharing your account with customers](https://help.sortly.com/manage-team#sharing-account)
8. [FAQ](https://help.sortly.com/manage-team#faq)
## How user roles work
Every user in your Sortly account is assigned one of three roles. The role determines what they can see and change.
### Owner
Full access to every folder and every setting in the account.
### Admin
Full access to every folder, with limited settings access. Admins can't access billing details.
💡 Admins who are given the Manage Users permission can add and remove Team Members and Custom Roles and assign role permissions. They can't do this for other Admins or Owners.
### Team Member
Access to one or more folders, based on the permissions you set. You can give a Team Member Edit or View Only access to each folder.
## Who can do what
## Invite or add a user
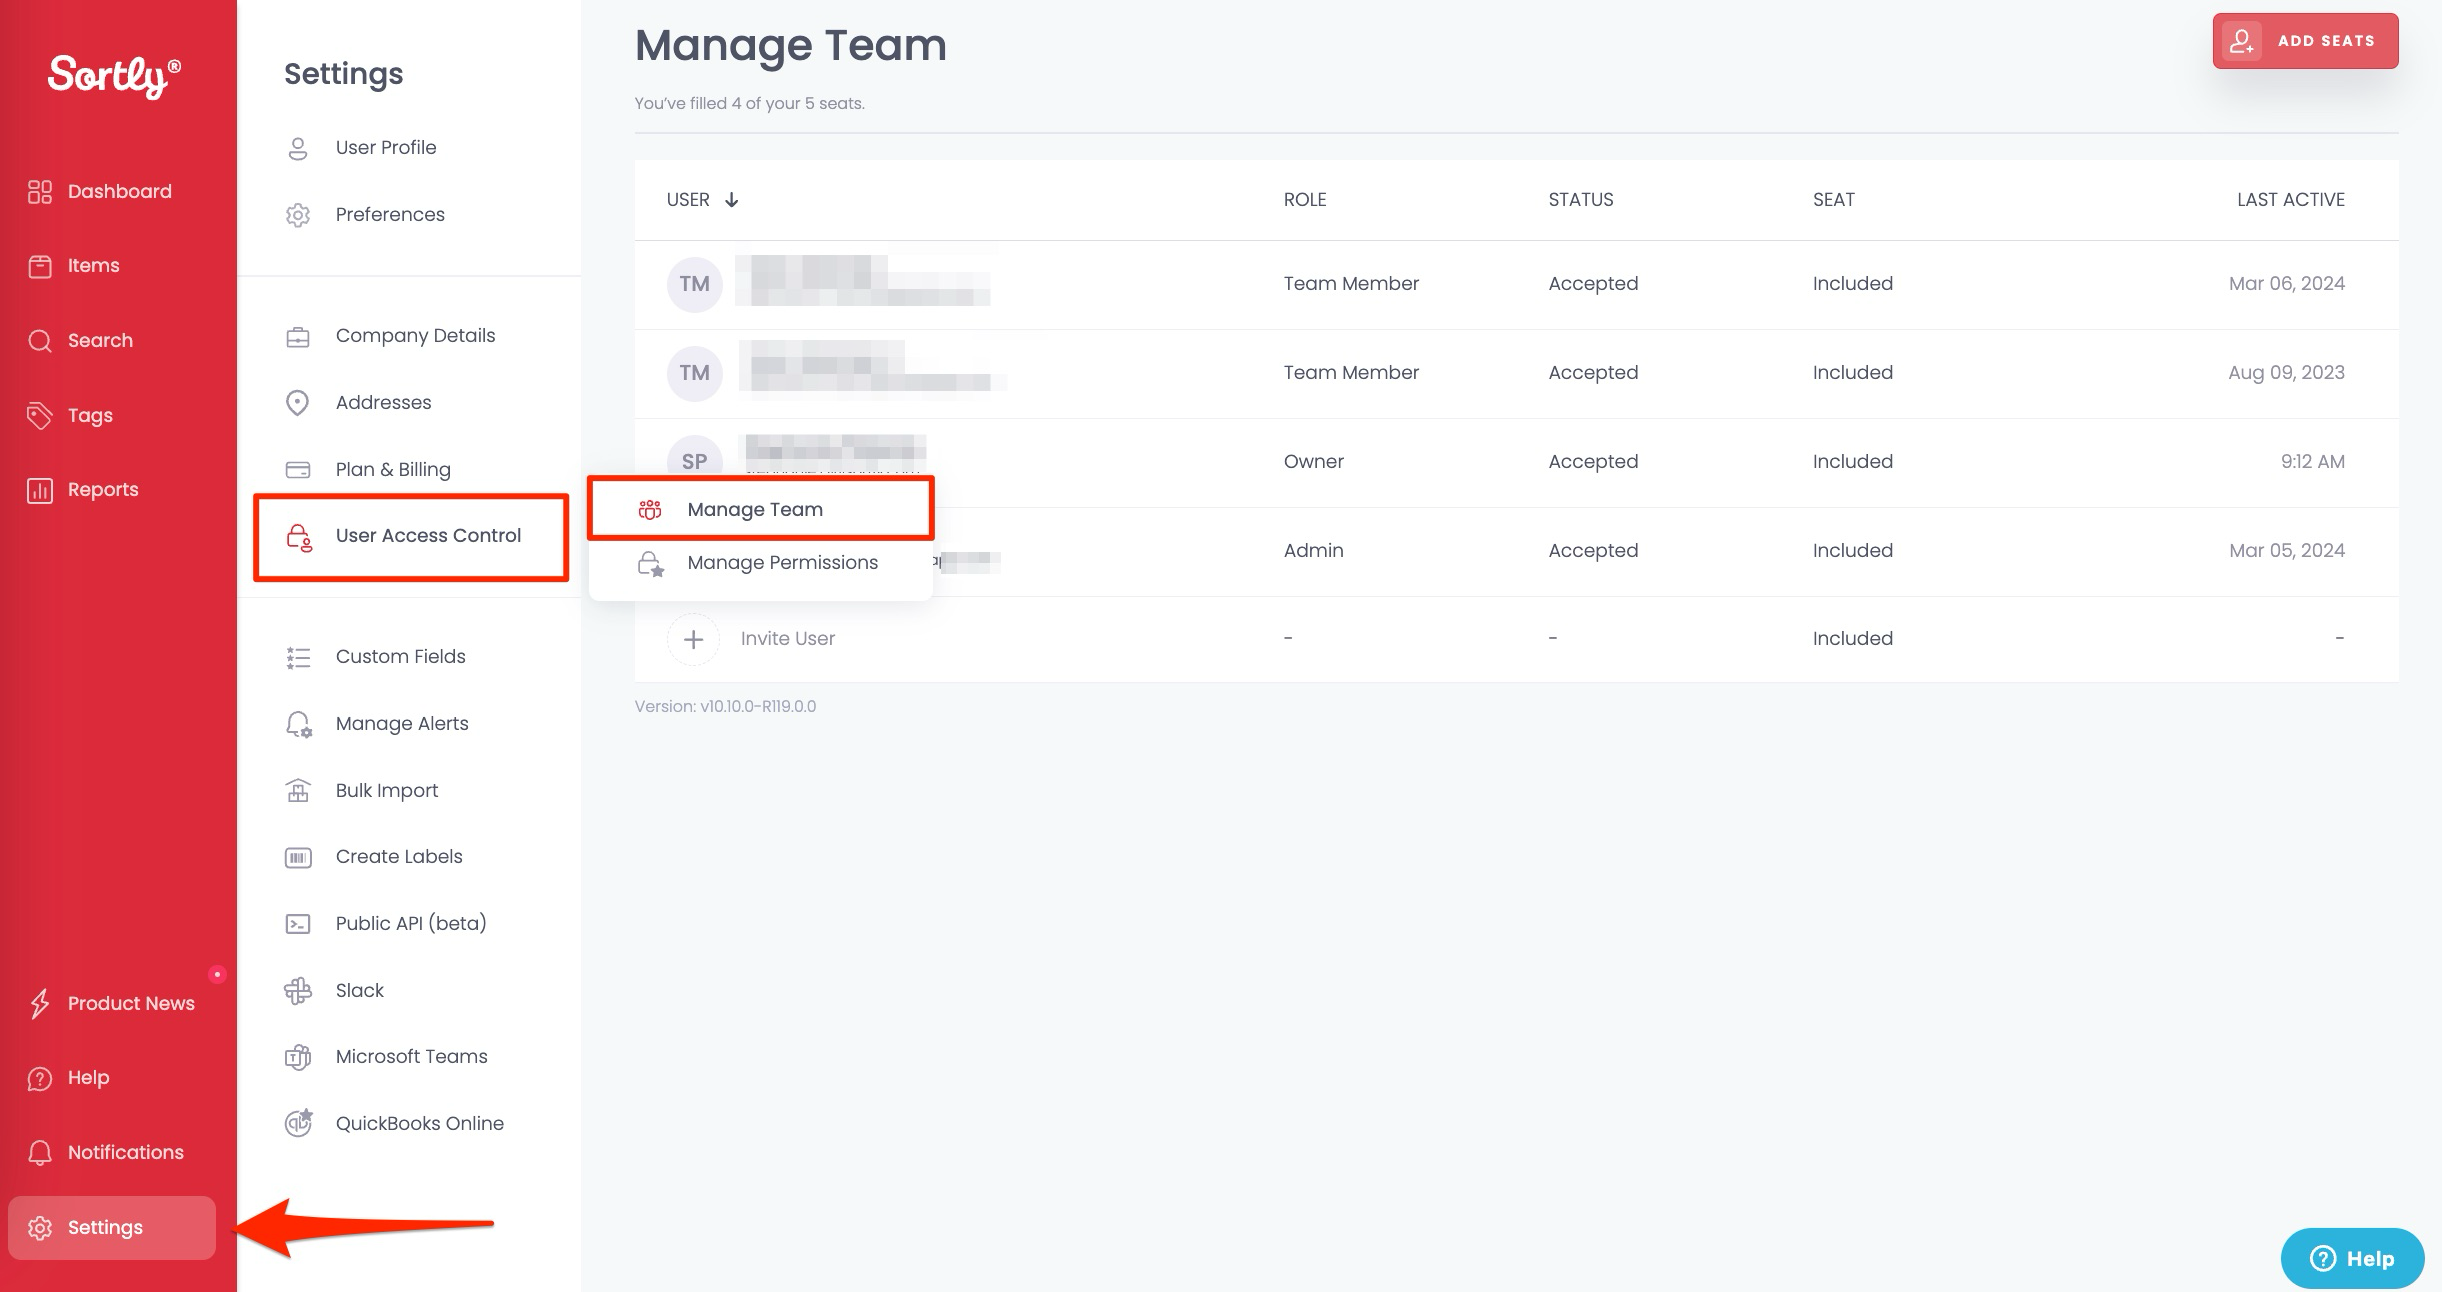
1. 1**Open Manage Team**
Click Settings \> User Access Control \> Manage Team.
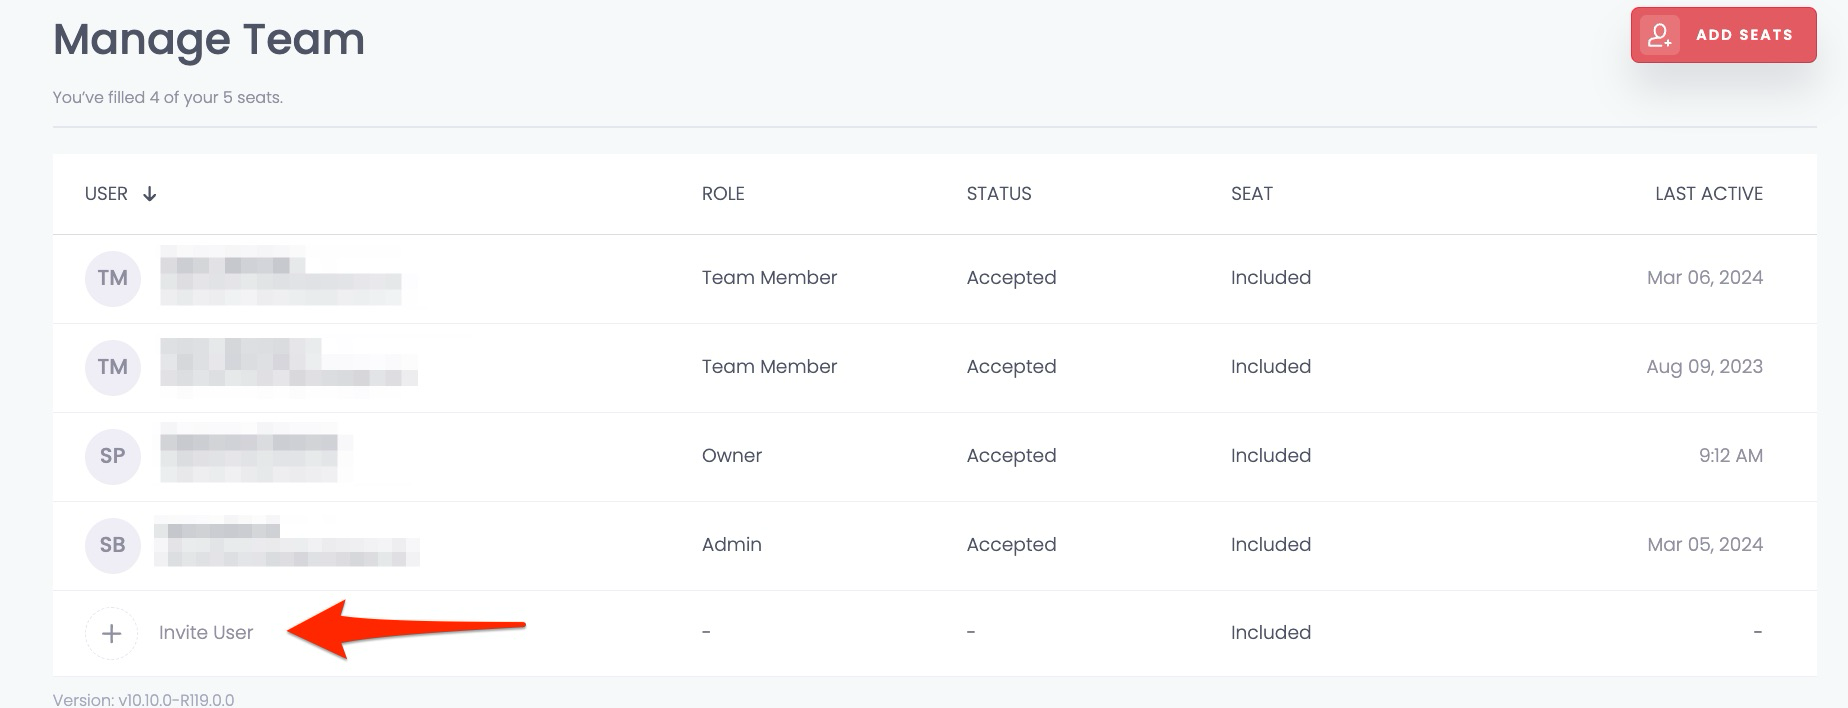
2. 2**Click Invite User**
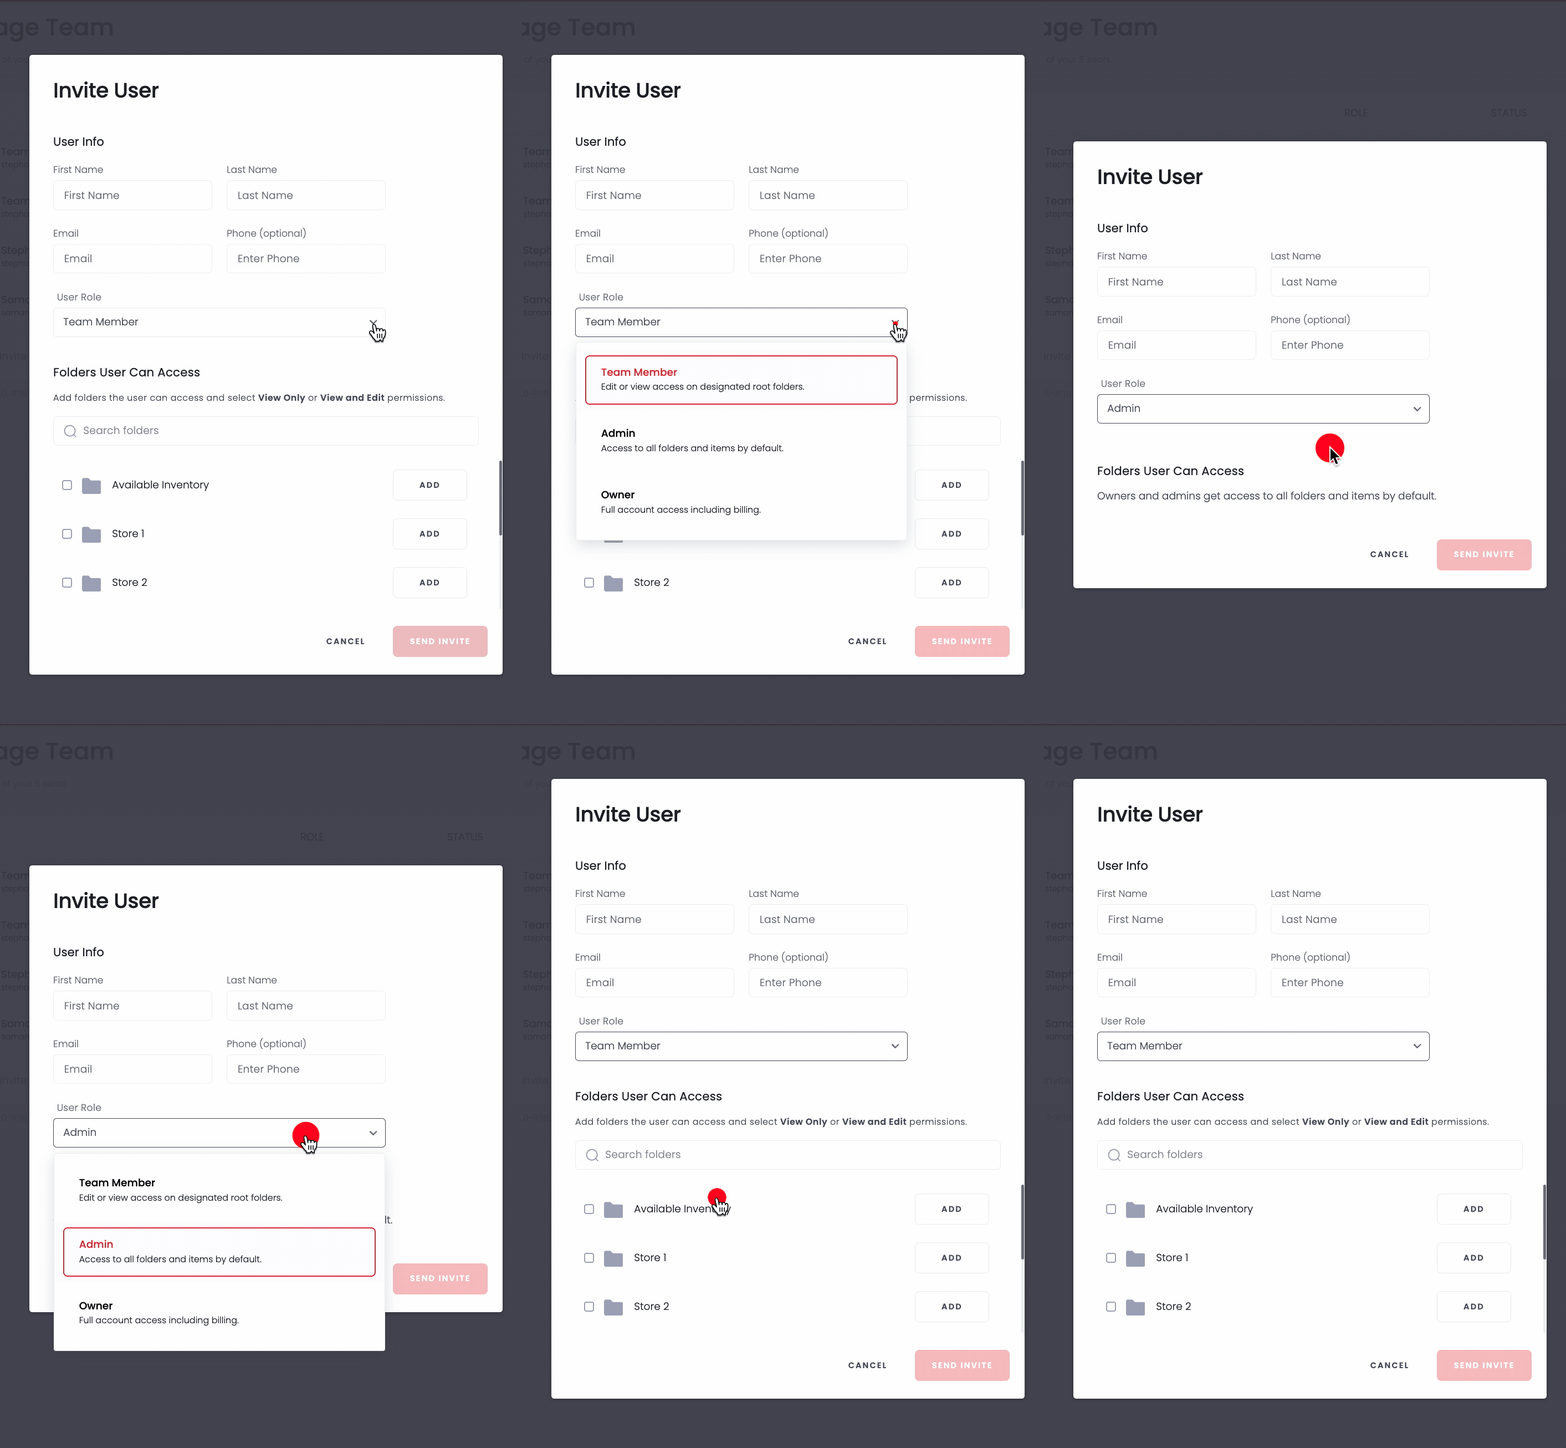
3. 3**Enter the user's information and role**
Fill in the user's details, choose their role, then click Send Invite.
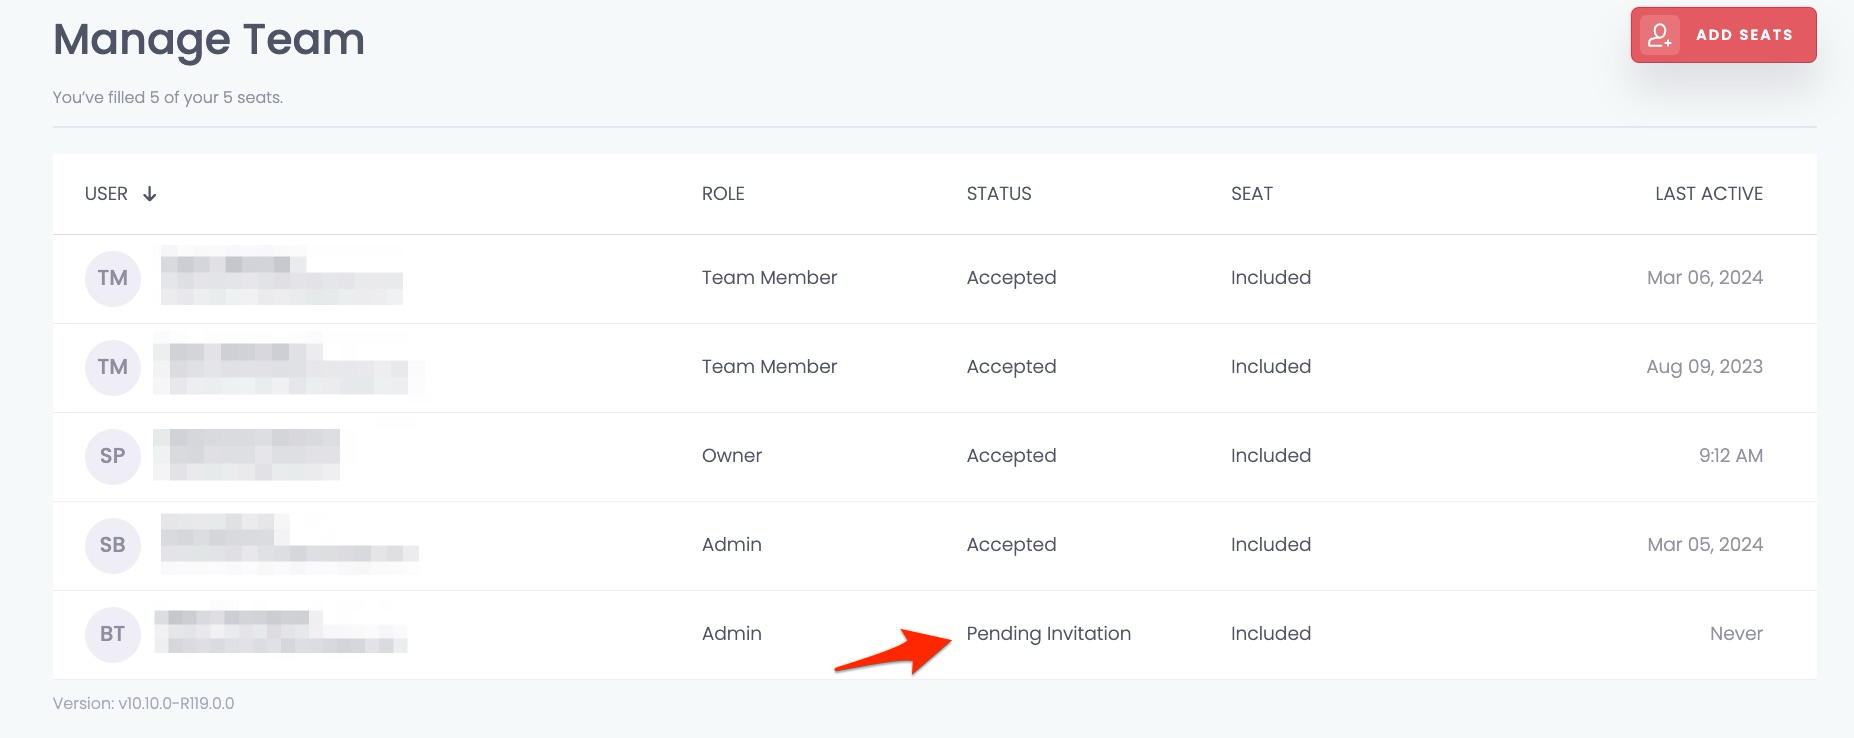
4. 4**Track the invite status**
The user receives an email invite once you click Send Invite. Their status changes from **Pending Invitation** to **Accepted** once they accept.
⚠️ If a user doesn't receive the email invite and their status stays at **Pending Invitation**, have them check their spam or junk folder. If they still can't find it, contact our [Support Team](https://help.sortly.com/hc/en-us/requests/new?hsLang=en).
## Set folder permissions for a Team Member
Give a Team Member access to exactly the folders they need, and choose whether they can edit or only view each one.
1. 1**Open Manage Team**
Click the settings icon on the folder menu, then select Manage Team.

2. 2**Click Invite User**

3. 3**Choose the Team Member role**
Enter the user's information and set their role to Team Member.

4. 4**Grant folder access**
Click Add next to each folder the user should access. This gives them Edit access. Choose View Only if they should only view the folder. You can revoke access from this same screen.
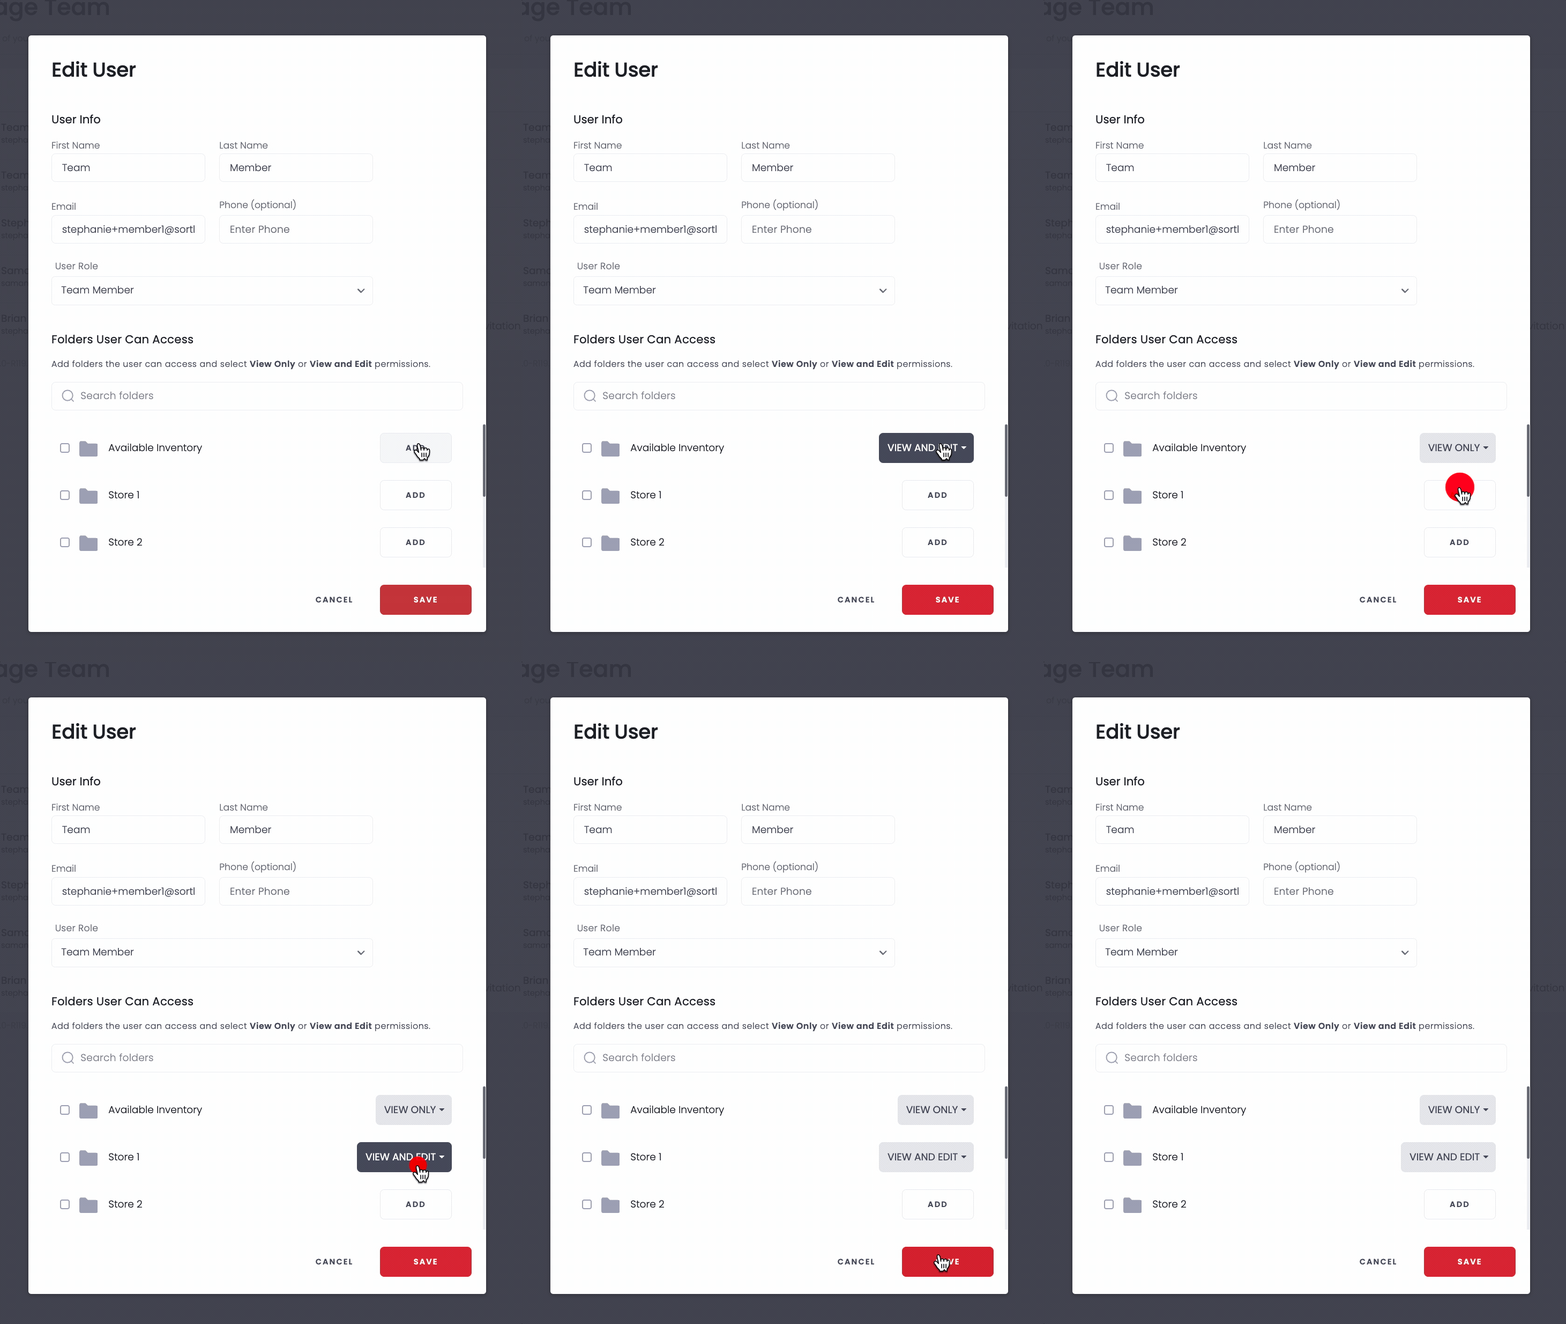
5. 5**Send the invite**
Click Send Invite. Their status changes from **Pending Invitation** to **Accepted** once they respond.

## Remove a user
1. 1**Open Manage Team**
Go to Manage Team in your account settings.
2. 2**Find the user**
Locate the user's name in the list.
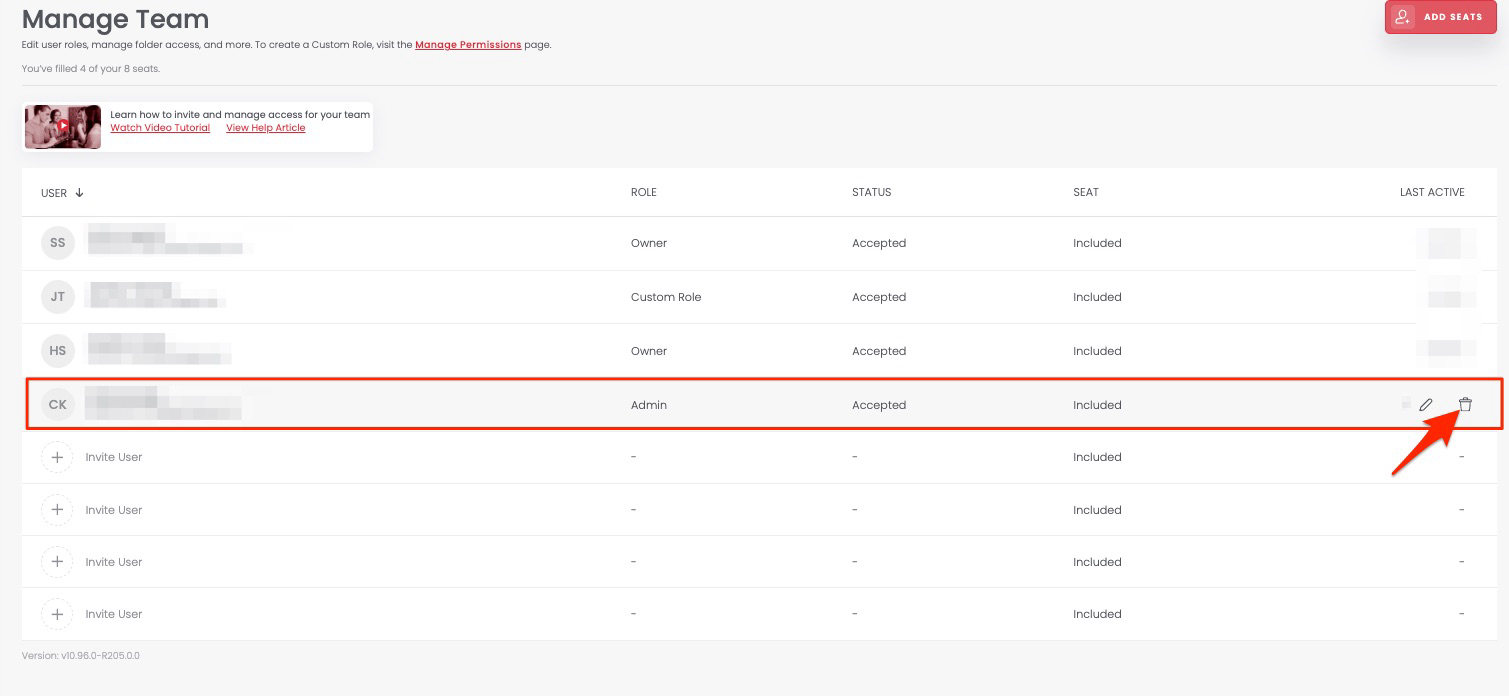
3. 3**Remove the user**
Hover over their name and click the trash can icon.
## Add or remove a user seat
Each plan includes a set number of user seats. Included seats are part of your plan and cannot be removed. Only paid additional user seats can be removed and credited.
### Add a user seat
1. 1**Open Manage Team**
Navigate to Manage Team in your account settings.
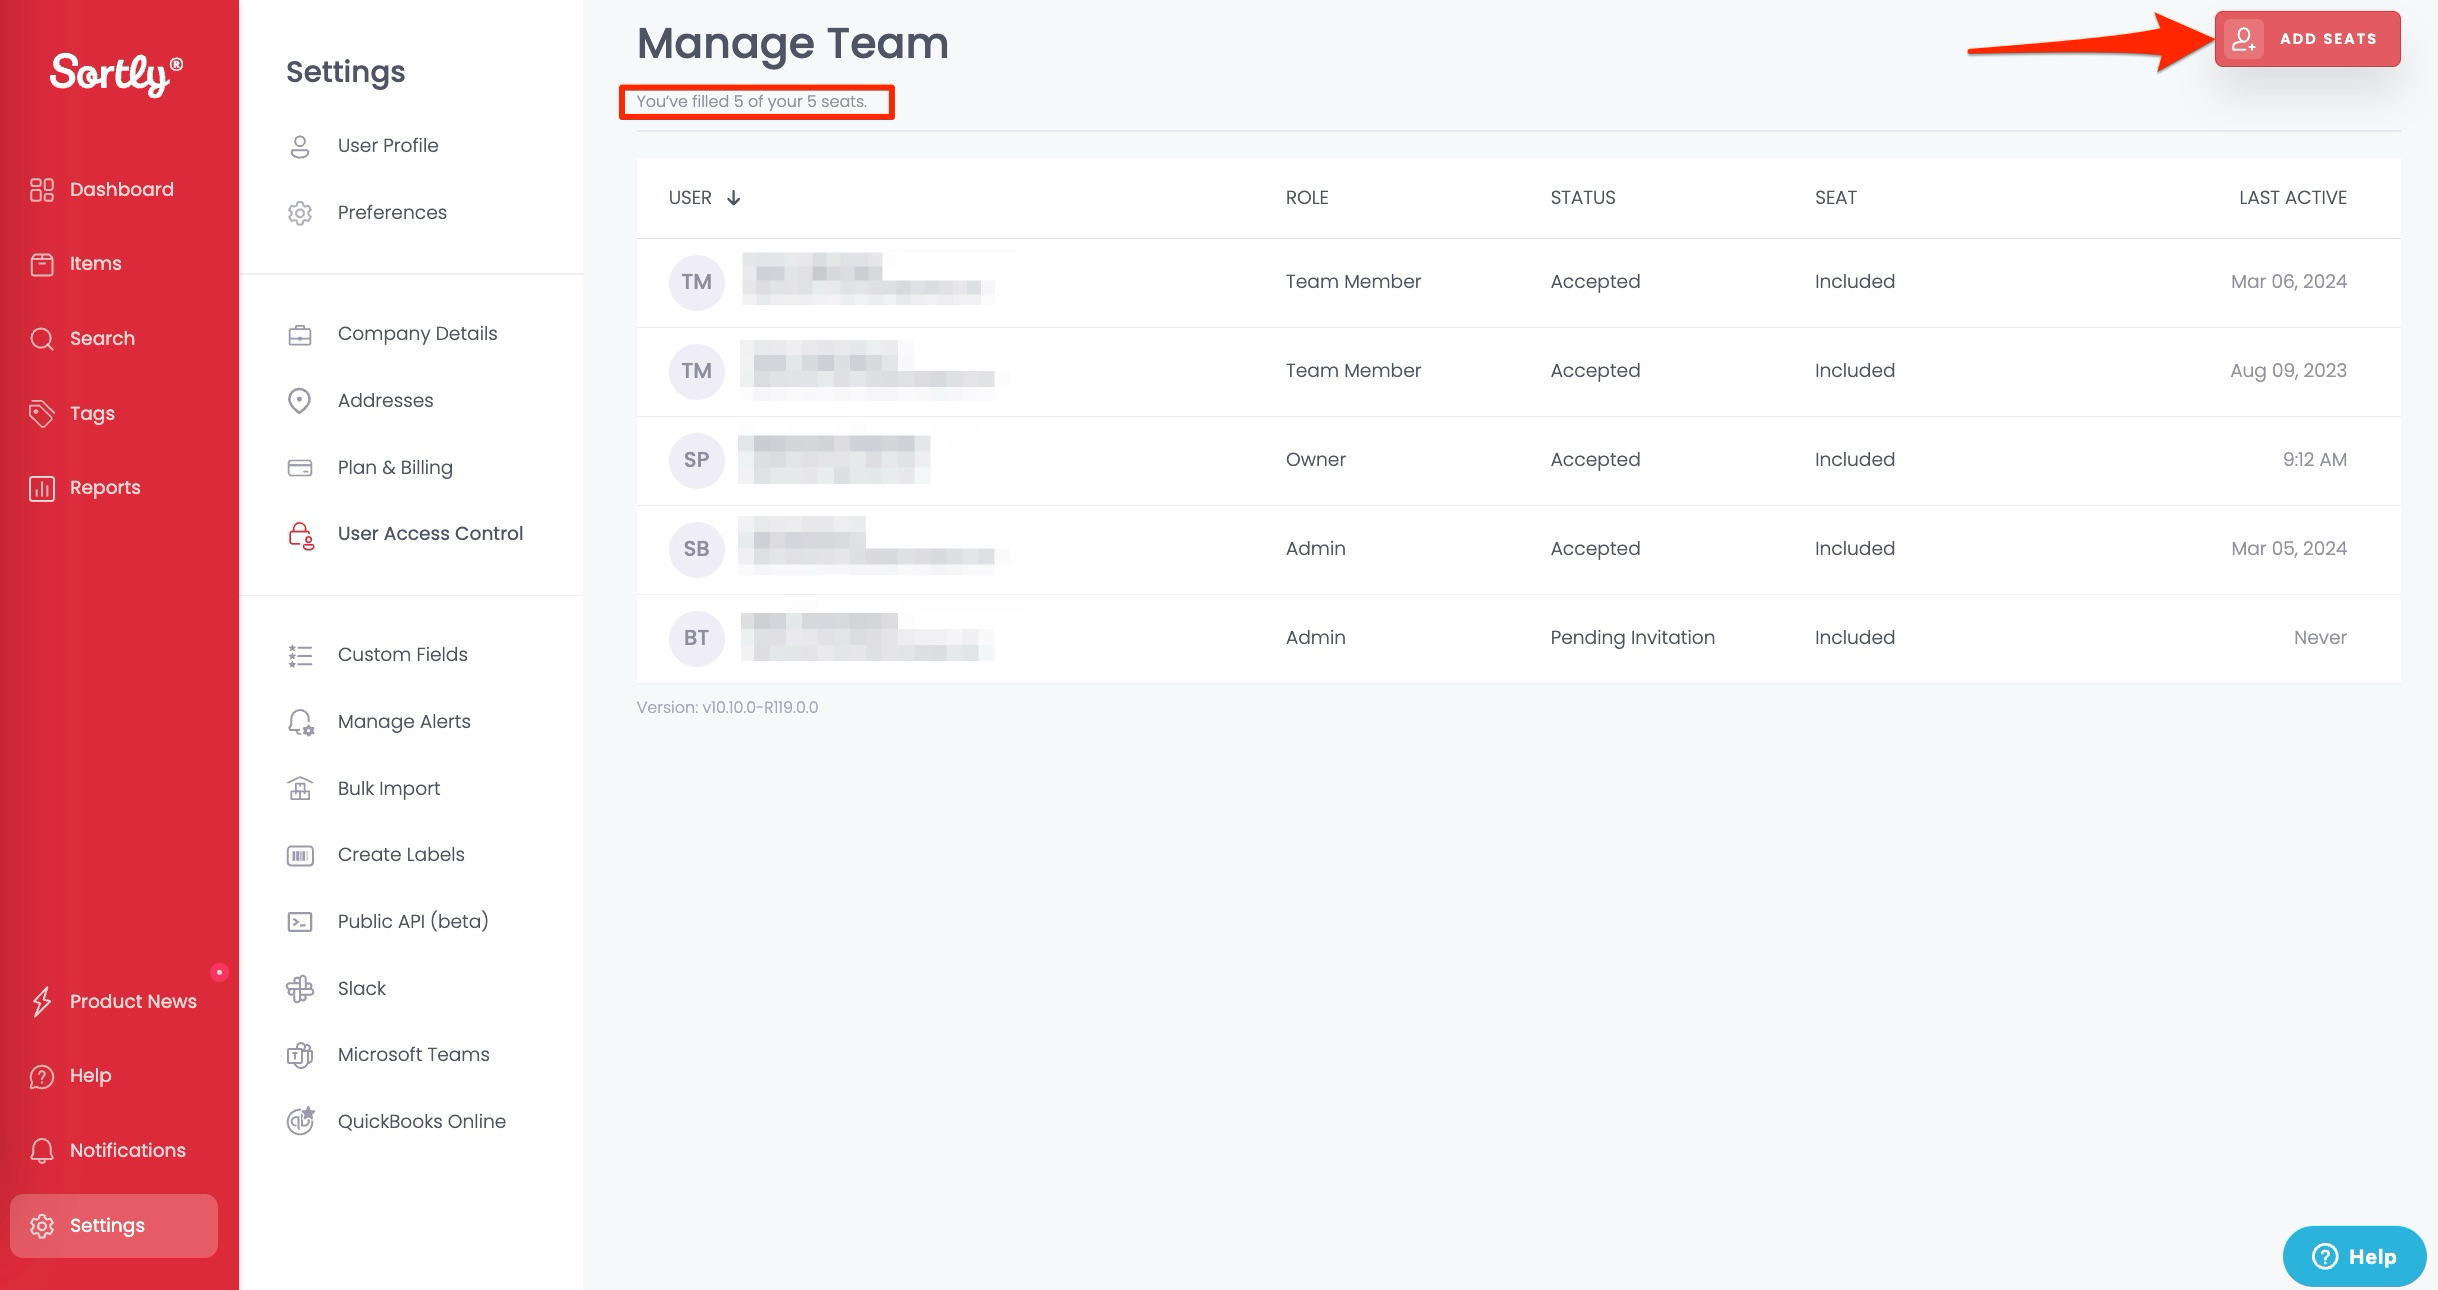
2. 2**Add the seat**
Click Add Seat in the upper-right corner.
### Remove a user seat
1. 1**Open Manage Team**
Navigate to Manage Team in your account settings.
2. 2**Free up the seat**
Remove any users occupying the seat(s) you want to delete.
3. 3**Delete the seat**
Click the trash can icon again to delete the additional seat entirely. You'll receive a credit for the unused time, applied to your next invoice.
⚠️ Don't see a trash can icon? Only paid additional user seats can be removed. Seats included with your plan can't be deleted and won't show a remove option.
## Sharing your account with customers
### Adding a customer as a new user
You can share inventory with customers by adding them as a new user in Sortly. See [Invite or add a user](https://help.sortly.com/hc/en-us/articles/360000751571?hsLang=en) above. Give customers a Team Member role.
### Sharing without giving Sortly access
If you don't want to give a customer a login, export a CSV, Excel, or PDF report and send it directly instead. See [how to export reports](https://help.sortly.com/hc/en-us/articles/360000735112?hsLang=en).
For seat limits by plan, see [Current Sortly Plans](https://help.sortly.com/hc/en-us/articles/31329803827867?hsLang=en).
## Frequently Asked Questions
Do I need a user seat for each of my employees?
Yes. A user license, or seat, is required for anyone who needs to access your account to view or edit inventory.
Why am I being charged for user seats?
Each plan includes a set number of user seats. If you add more users than your plan allows, the additional seats are billed at an extra cost. Contact our [Support team](https://help.sortly.com/hc/en-us/requests/new?hsLang=en) with questions about your plan or charges.
Which plans support multi-user access?
Multi-user access is available on all paid plans. Premium and Enterprise plans include additional permission options. See [Manage Permissions (Premium & Enterprise)](https://help.sortly.com/hc/en-us/articles/14451794715419-Manage-Permissions?hsLang=en) for setup instructions.
[](https://www.sortly.com/)
Copyright © 2026, Sortly Inc.